How to apply javascript to static pages in Shopify
Directly below is the rich text editor for a static page in Shopify. Static pages do not display dynamic content as do product catalog pages. In stead, static pages display unchanging content. Most common examples include the 'About Us' and 'Contact Us' pages.Adding HTML code is straight forward. You simply click the button highlighted in the image. However, if you entered javascript this way, it will not work.
This post illustrates how it is possible to apply javascript to static pages in Shopify. The workaround involves 2 major parts: 1) creating an entirely new template with javascript for each page (ie versus placing content in the rich text editor shown above) and 2) selecting that template within the rich text editor (while leaving the rich text editor window empty).
Part 1: Create a new template
- Log in to Shopify
- Make the following selections 'Online Store', 'Theme', the '...' button and then 'Edit HTML / CSS'
- Click 'Add a new template' (in the left column)
- Select 'page' from the drop down menu (as pictured in the image immediately below)
- Write the name of the new template (in the text box after the word 'called' in the image below). I suggest using a recognizable name like that of the static page. In my example, I called the template 'Contact_Us'. Do not name it 'contact' because Shopify has another page template named 'contact'.
- Click the 'Create template' button. The contents of the new template (as a liquid file) should appear
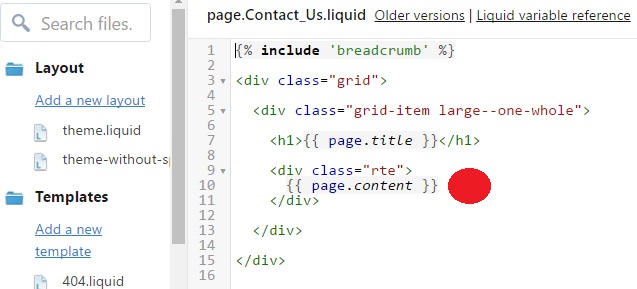
- Enter your code, including javscript into the space immediately after the code {{ page.content }} and before the next </div> tag, as shown by the red dot in the image immediately below
- Click 'save' (in the top right corner)
- Return to the rich text editor
- Leave the 'Content' empty (as shown below). That is where you would have otherwise entered all of the details that should appear on the webpage
- In the 'Template' drop down menu to the right of that empty 'content' box, select the template. In this example 'page.Contact_us' as pictured immediately below
--
--
RELATED CONTENT


No comments:
Post a Comment
Note: Only a member of this blog may post a comment.