Showing posts with label Zoho. Show all posts

Friday, December 9, 2016

Zoho Email Forwarding

Zoho email forwarding allows you to create an automated service that sends incoming email of address #1 to the inbox of another address, address #2. This is useful in different applications. For instance, previously I gave instructions for adding a new 'from email' so that you can log in to only 1 Zoho account while sending emails from any of several addresses. Although this works fine, it will still be necessary to return to the other account to view new emails that arrived in that inbox. However, Zoho email forwarding eliminates the need to ever return to that other email account. In other words, you can not only send but also receive emails for jo@domain.com, jane@domain.com accounts while logged in to only 1 account like admin@domain.com. Here is how.

  • Ensure that both Zoho email accounts are current
  • Log in to address #1 (ie the address from which incoming email will be forwarded)
  • Click 'Settings' (in the top right corner)
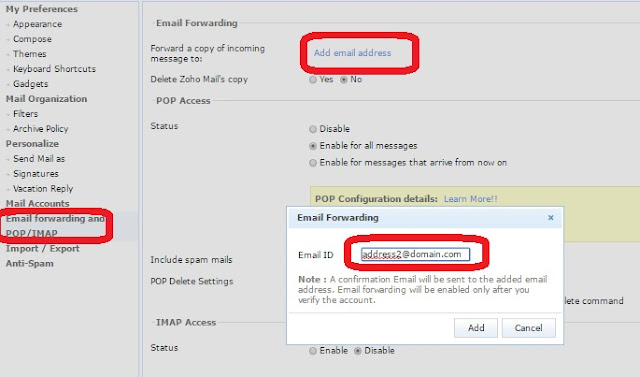
  • Select 'Email forwarding and 'POP/IMAP' link
  • In the 'Email forwarding' section, click the Add email address' link. A new modal popup window will appear as pictured immediately below
  • Enter the 2nd email address (ie to which incoming email should be forwarded)
Zoho email forwarding


  • Copy the confirmation code in an automatic email in the inbox of that second email address
  • In the account of address #1, click the 'Verify' link in the top right corner of the 'email forwarding' screen settings of address #1
--
--
  • Paste that confirmation code into the box
  • Test whether the email forwarding works. Using a 3rd email address, send an email to address #1. If email forwarding was set up correctly, the test mail should appear in the inbox of address #2.


RELATED CONTENT

Thursday, November 24, 2016

Add a New From Address in Zoho Mail

Previously, we discussed how to set up a free custom domain email address with Zoho and to create new Zoho email aliases (ie email addresses that use the same domain). This post goes a little further to show how to add new from email addresses in Zoho mail. In other words, if you have 2 aliases (or email addresses), you can log in to only one account and send emails from both addresses. A dropdown menu in the 'From' field will allow you to select between your 2 alias. 


WITHIN 1ST EMAIL ADDRESS ACCOUNT (ie the Zoho account from which you will be logged in when sending emails)
  • Log in to Zoho mail
  • From within your inbox, click the 'Settings' icon (in the top right corner). A second menu column should appear.
  • Click the 'Mail Settings' tab to expand its view
  • Scroll down to the section 'access old version for'
  • Click 'Send Mail As'
  • Click 'Add From Address' button
  • Enter only an alias / email address that you created previously as follows. (This will not work with aliases that do not already exist. See how to create Zoho email aliases)
  • Select 'Send Verification'. An automatic email will be sent to the inbox of the 2nd address (ie the new 'from address')

It is common practice to set the 'Display name' field to 'Jane from Company' when an email address will be used for sending to mailing lists. See image immediately below.
With the 'Display name' as 'Jane from Company', this is how the email will appear in the 'Sender' field of the email recipient's inbox.
WITHIN 2ND EMAIL ADDRESS ACCOUNT
  • Check the inbox of the 2nd 'from address' for an automatic response from Zoho mail.
  • Copy the confirmation code
--serverpoint hosting banner --


WITHIN 1ST EMAIL ADDRESS ACCOUNT
  • Click 'Settings' icon
  • Click the 'Mail Settings' tab
  • Click 'Send Mail As'
  • Click the 'verify' icon (which looks like the bust of a person, as pictured below)


  • Paste the confirmation code and click the 'Submit' button
  • Run tests to verify whether the process works:
    • Refresh the inbox screen
    • Click 'compose new mail'. If you configured everything correctly, there should be a dropdown menu in the 'from' field as pictured below. 

--
--
If the 2nd address uses auto-signatures, you will also need to create the autosignature within the 1st account, click the '+' sign and then select the 2nd address in the dropdown menu.

Note however that, When someone responds directly to emails from a second email address, that email will only go to the 2nd email address. This process therefore applies only to sending (not receiving) mail. If you want to see the reply, set up Zoho email forwarding.

--serverpoint hosting banner --

RELATED CONTENT

Sunday, November 20, 2016

Zoho Email Aliases

Previously, we went through the steps for setting up a custom domain email address with Zoho. Most people's first email alias is 'admin' to create a custom domain email address admin@yourdomain.com. This post will go through the steps for setting up additional aliases like 'sales', 'jane' and so on. 

  • Log in to https://mail.zoho.com/zm (using your admin alias)
  • Go to the top right and click on the 'Settings' icon (that looks like a gear, pictured immediately below) 


  • Within 'Settings', select 'Control panel'. You will see the 'Dashboard' with your total number of users, domains and so on, as pictured below. --
    --
  • Select 'User details' from the 'Control Panel' on the left side of the screen 


  • Select 'Add User' (as pictured immediately below)


  • You can add new users in one of two ways; either enter their details for them (in the higher section of the image immediately below) or allow the new user to enter his / her details (in the lower section of the image immediately below). In this example, a new email address john@domain.com will be created. Since it has a password, anyone can now access it once the admin person sends the information to the intended user


  • When you return to your 'Dashboard' (in the left column), you should now see an additional number of total users.
  • At this point, the user of the new account will have to login at https://mail.zoho.com/zm with the password that you created. 
--serverpoint hosting banner --


Friday, November 18, 2016

Zoho Mail Setup Domain Verification and Mail Exchange MX Records in GoDaddy

Zoho email is a free means of sending email with your custom domain. For instance, your email will be you@yourdomain.com (rather than you@gmail.com). One key advantage of sending custom domain emails is that they appear more professional and engender more trust. This post applies only if you bought your custom domain from GoDaddy (and not directly from an ecommerce host like Shopify).

The process involves 2 main steps; 1) verifying your domain and 2) setting up mail exchange (MX) records. 
--
--

Step 1 - Domain verification (CNAME Method)


When you sign up for a Zoho account, you will be directed to a 'Domain Setup' page like the one pictured below.  The table provides data that should be copied and pasted on the website of your domain provider (like GoDaddy, NameCheap, etc).


  • Log into your domain provider. We will use GoDaddy in this example. 
    • Log in to GoDaddy.com
    • Go to the DNS Zone
    • Select the domain (to which the Zoho email will be attached)
    • Click 'Add Records' (as pictured below)
    • A new popup dialog box will appear. As shown below, select 'CNAME'


  • Paste the data from the table provided by Zoho (as shown above). The 'host' code that starts 'zb' is unique to your Zoho account. Consequently, do not copy and paste the codes pictured on the 2 demonstration photos here. 


  • Click 'Finish'.


--
--


Step 2 - Mail Exchange (MX) records

In this example, Zoho provides 3 Mail Exchange (MX) records. This number may vary. These records are not specific to any single account and can therefore be copied from this webpage or the Zoho website. You will need to add all of the Zoho MX records provided to your domain provider's site. (demonstrated below). 


As mentioned above, you will need to add all 3 of the Zoho MX records to your domain provider's site. Below is an illustration using GoDaddy.com. 


  • Log in to GoDaddy.com
  • Go to the DNS Zone
  • Select the domain (to which the Zoho email will be attached)
  • Click 'Add Records' (as pictured below)


  • The pop up dialog box appears. Select 'Mx Mail Exchange' as the record type as shown below.
  • As pictured below, paste the information for each Zoho MX record into the fields and click 'Add Another' for the 2nd record. Below shows the 1st of three Zoho MX records. The second will show mx2.zoho.com with the priority set as 20 (as shown in the list of records above). Continue in the same way for the 3rd record.
  • Wait for the information to populate. It often takes 1 to 2 hours. However, it can take as long as 24 hours.

Wednesday, September 21, 2016

How to Find Sent Emails in Zoho

How to Find Sent Emails in Zoho

I know this seems so easy ... and, like anything else you've figured out, it is. However, it took a few frustrating sessions as a newbie before I was finally able to find my 'sent' emails. Here is how.

How to Find Sent Emails in Zoho


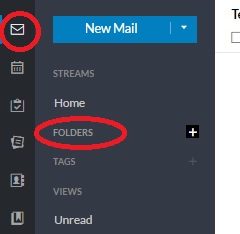
  • Click the 'Mail' icon at the top of the left column
  • Click 'Folders' (not the '+' sign on that option). A list of options should appear. It includes Inbox, Drafts, Templates and so on.
  • Click 'Sent'

--
--