This post continues from the previous post about creating transparent gradient filters over images in InkScape. These kinds of radial gradient images can be used for product collections. Although this post shows how to use this effect using the radial gradient within a circle, you can do the same within a rectangular shape.

- Import an image
- Draw a circle over the image. For richer colors in the result, make the color of the circle a lighter color (like white or close to white). Conversely, chose a darker color.

--
 |
| White gradient |
 |
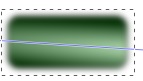
| Red gradient |
- Select and right click on the circle. As shown below, select the 'Fill and Stroke' option

- In the 'Fill and Stroke' dialog box, select the 'radial gradient' option

- In the lower part of that 'Fill and Stroke' dialog box, increase the 'Blur' effect as highlighted in the encircled section in the image below. This effect will soften and blur the edges rather than create a hard circular edge. When increasing the blur, the black handle bars around the object will extend. Ensure they never extend outside the straight edges of the image.
--
--

- Select the image and gradient section. As pictured below, dotted borders will appear around both (to indicate that you have made the selection correctly).
- From the top menu bar, select 'Object', 'Mask' and 'Set'

- The result will look like this
|
| White gradient |
- Create a rectangle (that you can use as a label). Place that rectangle to the back of the image by selecting 'Object' and then 'Lower to Bottom'.

Related Articles