Previously, we spoke about interviewing virtual assistants. This post deals with setting them up as new live chat agents so your virtual assistant can monitor and answer calls on her webpage only (and not the main website pages). The setup process involves 3 main steps, ie 1) creating a dedicated webpage, 2) fixing the settings (schedule, content and so on) and then 3) inviting the virtual assistant with live chat access as an 'agent'.
1) To create a new Tawk.to agent page
This Tawk.to page is ideal for agents who somehow support
your website but to whom you do not want to give admin access to your Tawk.to
dashboard. However, when website visitors arrive on their page, you will still receive
notifications.
- Log in to the dashboard of your Tawk.to admin account
- Go to ‘Admin’ (whose icon is a gear wheel).
- Click the ‘+Add’ in the 'Properties' section (in the left half of the page). Do not worry if the agent does not have his / her own website. That field may be left blank.
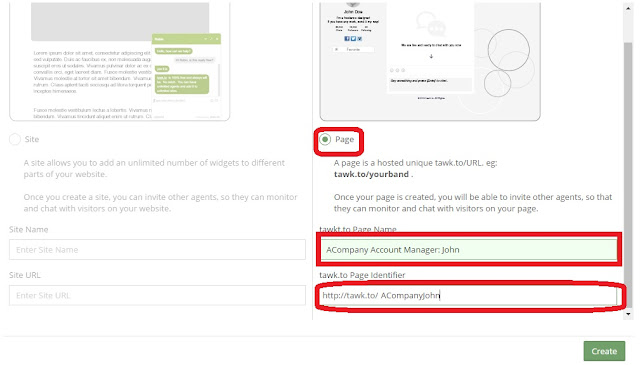
- While still in that property, click the ‘+Add’ in the 'Channels' section. As shown below, select 'page' and fill in the page title and URL. Then click the 'create' button.
2) To create the settings for a new Tawk.to agent
As you will see in step 3 of this post, your agent / virtual assistant will be unable to change several settings that are usually possible for admin members of a property. Consequently, as an admin member of the property you created in step 1, you will need to prepare the webpage and its settings on behalf of your virtual assistant agent. These settings include the following, the only necessary one of which includes the 'page content'.
3) Invite your new agent- Page content. Must do. Enter the agent's profile information (like name, position, skills, languages, schedule, URL links perhaps on your website and so on)
- Additional property members
- Widget settings, appearance and content
- Time schedule. This optional setting allows the live chat widget to switch between 'online' and 'offline' automatically according to a time schedule. It is like a door sign that says 'now open for business'
- Triggers.
- Tabs
- Agent alerts
--
--
Now that the page is configured, you may invite the virtual assistant / new agent to use the page.
- Go to ‘Admin’ (in the top menu)
- Select the property name of the tawk.to page from the 'property' drop down menu
- Select 'Property members' (below the property drop down menu)
- Click 'invite member'
- Select 'agent' in the 'role' drop down menu (as pictured below) and enter the virtual assistant's email address before finally sending
Immediately below is what a new (virtual assistant) invitee agent will see in his / her inbox. Since an invitee may be unfamiliar with Tawk.to, consider alerting them that the email will arrive from such a sender beforehand (because it will not be immediately obvious the email is coming from you).
After clicking on the confirmation button within the email, the new agent / virtual assistant will be directed to the following landing page to enter his / her name and password (as pictured immediately below in the fictitious invitation from 'Edward from ABC Company'.
Having access as an 'agent', your virtual assistant will see the 'Admin' area with the following limitations as pictured below.
Hold mock sessions with agents and or send instructions on how to use the following settings that are available to agents.
- Shortcuts. You can use shortcuts to help agents to quickly respond to customers regarding an ideal meeting time, especially if the agent can not currently meet with the customer.
- Direct messaging. If not used, you can communicate with the agent only by whispering while she is currently in a meeting with a lead or prospect. Direct messaging allows you (and her) to make contact to the other without needing to be in a meeting with a site visitor. This may eliminate emails and other communication methods.
- Ban lists.
- Aliases. As with any other employee, establish rules. For instance, agents can change their alias. Establish the rules for this.
- Email. You may ask that the agent share his / her Tawk.to ticket forward email. Emails sent to that account will be sent automatically into his / her Tawk.to inbox and, if you change the 'mail notification' section in admin, his / her personal, non-Tawk.to email inbox.
--
CONTENT RELATED TO NEW TAWK.TO INVITEE EXPERIENCES


No comments:
Post a Comment
Note: Only a member of this blog may post a comment.