As you can see in the picture, they carry no display screens for reviewing the names of songs or movies. In my personal experience, their relatively small size (of roughly 2 * 1 inches) makes them easier to handle than regular iPods. Besides, they also seem more durable. For instance, my old shuffler has outlived my newer and fancier iPod. Consequently, I have no reservations in recommending them. However, since people have often had trouble organizing their content (like single songs, entire albums and audiobooks), this post explains the steps specific to the iPod shuffler. Specifically, this involves selecting particular items on your computer's iTunes and copying only those items onto your iPod shuffler.
SPECIAL OFFER--Try Audible and Get Two Free Audiobooks --
--
1. Plug the iPod shuffler into the USB drive of your computer. If iTunes is not already open, you will usually be prompted to open it. (iTunes can be downloaded free of cost from the Apple.com website, even by Windows PC users).
2. A tiny iPod shuffler icon will appear (as circled in red below).
3. Click the iPod shuffler icon to review its content details. The details will appear in the same way as they do for the computer's content details (pictured above). To toggle from the iPod shuffler back to the computer's iTunes, click the music icon (highlighted in blue and in the far left upper corner as pictured above).
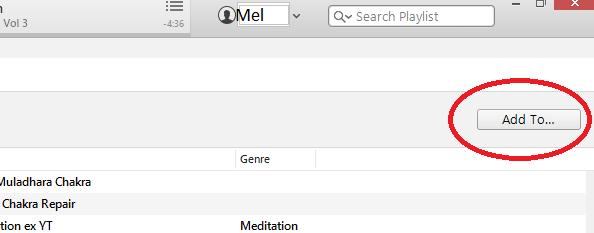
4. In order to simultaneously see the lists of both the computer's iTunes and the iPod shuffler, go into the iPod shuffler list (using the step above) and click the 'Add to ..' button in the top right corner of the screen (highlighted in red below).

Notice (in the image below) that that 'Add to ..' button turns into a blue 'Done' button. You will need to click this button when you have completed the transfer of items to your iPod shuffler. You will also notice that the computer's iTunes list appears on the left while the iPod shuffler list appears on the right.


5. You can select either single songs or entire albums by holding and dragging them from the computer's iTunes list (on the left) to a specific position among the list of items on your iPod shuffler (on the right of the screen). To copy single songs, ensure that the 'songs' selection appears in the dropdown menu in the top right corner of the screen (above the blue 'Done' button). To copy entire albums, use the arrow on that same drop down menu to find and select 'Albums'. In fact, there are other options to allow you to transfer songs to your iPod shuffler according to artists, composers and so on.
SPECIAL OFFER--Try Audible and Get Two Free Audiobooks --
--
To delete songs from the iPod shuffler, select the song within the shuffler's list (on the right side of the screen), go to 'Edit' (in the top left menu bar) and select 'Delete'. This will not affect songs in the list on your computer's iTunes.


No comments:
Post a Comment
Note: Only a member of this blog may post a comment.