 Here are several steps to fix your slow Mac computer. Single methods may increase the speed of your Mac noticeably. However, together, you will see an even more considerable difference.
--
--
1. Repair Permissions to Speed it up a Slow Mac
Depending on frequently you use your computer, you may repair permissions to every few weeks or months.
Go to Finder
Applications
Utilities
Disk Utilities
Click ‘MacIntosh HD’ in the top left column of the ‘disk utility’ box that appears
Before proceeding to the next step, set aside some time (very roughly 15 minutes) when you will not need to use the computer. Although you can use the computer during the process of repairing permissions, the computer might run even slower that usual.
Click ‘Repair Disk Permissions’ button below the window of the ‘Disk Utility’ box. (If that button can not be activated, you will need to click the ‘Verify Disk Permissions’ button and go through that process first.)
2. Run your Mac on sufficient memory to Speed Up a Slow Mac
Memory is the medium over which data like internet pages and commands to save files and so on are transferred back and forth from a source like the internet or your program commands to the processing unit. If you need to use a lot of RAM, consider an upgrade, ie buying and installing more RAM. Sometimes, you might simply need to use your Mac more efficiently. For instance, you can minimise the number of browser windows open while surfing the internet.
To verify whether you need more RAM, check your Mac's activity with the following steps.
Right click the 'HD MacIntosh' icon on the desktop then click 'Get Info'. Take note of the 'Available Space' field. It should be at least 10% of the 'Capacity' field.
It may be easier to remove a few larger files or programs than many small ones. If you wish to identify programs that use the most memory, go to 'Applications' folder, click on 'Utilities' and then 'Activity Monitor'
You can sort / rank by clicking on the tabs like ''% CPU', 'CPU time' and so on. The display will show the programs with the greatest use of the memory.
While in '% CPU', click the 'CPU Load' at the bottom of the window to see a black screen with 'CPU history'. The green dots should be low on the screen for a properly running computer. If the green reaches the ceiling, check to see whether you have a lot of applications running, insufficient RAM memory insufficient hard drive space and so on. For your information, just surfing the internet with many tabs open, especially with multimedia content can hog your RAM. Otherwise, there may be rogue activity if you have already addressed the possible explanations discussed above.
3. Have Enough Start Up Disk Space to Speed Up Your Slow Mac
You must check the amount of your 'Start up Disk space'. To
do this, double click on the 'MacIntosh HD' icon that is usually on your
'Desktop', right click on 'Get Information'. See how much of the space capacity
is available - the more the better. 10% or more free / 'available' space is good.
‘Login applications’ are programs that open automatically when you login. To free up login applications, use the following steps
Click the ‘Apple’ icon in top left corner of the screen.
Click ‘System Preferences …’, then ‘Users & Groups’ (aka
‘Accounts’ in other Mac OS versions) and then the ‘Login Items’ tab
You will see a list of applications. The ideal is to have as
few applications in this list as possible. In that case, remove any that you
really do not need by clicking on the application to highlight it and then
clicking the minus button below the list.
4. Reset the ‘PRAM’ (or 'NVRAM') to Speed Up a Slow Mac
PRAM is a small amount of memory that stores information
like date and time, time zone and volume settings. Since many programs access
PRAM, data can become corrupt which in turn can slow down the computer’s
performance. You may visit the Apple Support site for more information about resetting the PRAM and follow the steps below.
Shut down your Mac.
Locate the following keys
on the keyboard: Command (⌘), Option, P, and R. You will need to hold these keys down
simultaneously in the following step. Some users reported having problems with this process when they used a wireless keyboard. To avoid this potential problems, use a regular keyboard.
Turn on the computer.
Press and hold the
Command-Option-P-R keys before the gray screen appears.
Hold the keys down until
the computer restarts and you hear the startup sound for the second time.
Release the keys.
After resetting NVRAM or PRAM, you may need to reconfigure your
settings for speaker volume, screen resolution, startup disk selection, and
time zone information. If issues persist, your Mac's logic board battery (not a
portable Mac's rechargeable battery) may need to be replaced. The logic board
battery helps retain NVRAM/PRAM settings when your computer is shut down. You
can take your Mac to a Mac Genius or Apple Authorized Service Provider to
replace the battery on the logic board.
5. Declutter your Desktop to Speed Up a Slow Mac
Believe it or not, something as simple as placing all of your files into a single folder rather clutter your Mac's desktop will speed up your Mac. Quite apart from that, clutter accumulates from uploaded movies, photos, multimedia project and duplicated files, the programs you downloaded from the internet long ago and then forgot about and so on.
6. Minimise your Dashboard Widgets to Speed Up a Slow Mac
Remove the widgets that you do not use.
- Open your Mac's 'Dashboard'. Click the 'Dashboard' icon from the 'Dock' (or open the 'Dashboard' from within 'Applications')
- Click on the 'minus' sign in the lower left corner of your screen. This will make close buttons appear next to all running widgets
- Close any widgets you do not use on your Mac
7. Defrag to Speed Up a Slow Mac
Defragging is no longer required (unless you run Bootcamp for running Windows). Note however, that you may be overworking your computer if it quickly overheats and works very hard to process information. It might not have enough (roughly 10% or more) free memory to allow newer mac computers to automatically defrag. See video about defragging a mac. You may however use the following steps.
How to defrag a slow mac - Method 1
- Use the 'Repair Permissions' method above
How to defrag a slow mac - Method 2
The next suggestions helps with the fact that your Mac might have begun the tedious task of re-indexing files. This is one reason that it might have to work overtime to find and process files as you use them.
Click the 'Apple' icon in the top left corner of the screen
Select 'System Preferences', then 'Spotlight' (in the top row of options) and then 'Privacy' tab
The box will usually appear empty
Drag the 'HD MacIntosh' icon into that empty box
Click 'OK' when asked whether to exclude the 'HD' from searches
Allow the computer to organize the files. It is easy to think that the process has or will not begin because it can take up to 15 or more minutes to begin. The progress will be clear if you clicked on the 'Spotlight' icon in the top right corner of the screen. When you mac has not yet begun, you will still be able to search the drive. However, once the process begins, the mac's processing unit will make its usual processing sounds and you will see the following screen. The process can even take as much as an hour or more.
- When the process has completed, remove the 'HD MacIntosh' icon from the box if you wish to include it in searches again.
How to defrag a slow mac - Method 3 (Time Machine)
You may use TimeMachine to create a defragmented backup on a separate hard drive before restoring it. Time Machine is free software that comes with your computer. It therefore offers a free alternative to buying defrag software.
Step 1 - Backup to Time Machine
Click 'Apple' icon in the top left corner of your screen
Select 'System Preferences'
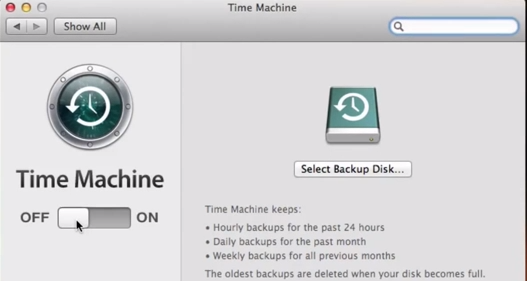
Within the 'Systems' section, select 'TimeMachine'. Ensure that the switch is in the 'off' button as shown below. (You can switch TimeMachine on after setting it up).
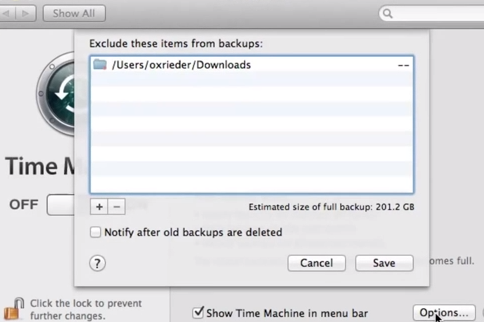
Click the 'Options' button in the lower right corner. The window that appears shows all content that you do NOT want TimeMachine to backup. Since you wish to backup the entire computer, remove any items that needs to be included. Remove items by highlighting the line of that item and then clicking the minus ( - ) button below the window. Click 'Save' when done.
Connect your external hard drive. They usually plug in via USB, firewire or wifi. Once you do this, TimeMachine will recognize the drive and ask whether you wish to use it for backup. Click 'Use as Backup Drive'. (If you want to rename the drive, click 'Later'. When you have renamed the drive, click the button 'Select Backup Disk' that appears on the main 'Time Machine' window (pictured above).
After the last step, TimeMachine automatically turns 'on'. Do not worry! TimeMachine will not just start backing up immediately. However, as pictured below, it will automatically schedule a backup to begin within about 30 minutes. If you need to make additional changes, turn it back 'off' again.

The backup process should start immediately and take as long as a few hours for situations involving a first time backup or very slow (USB) connection mac.
When the process is done, you will receive notification. If you will eject that external hard drive, eject it properly. To eject the drive properly, go to 'Finder', select 'File' then 'Eject'. Pull away the cable only after the icon disappears from the desktop.
Step 2 - Restore the Backup from Time Machine
If the Time Machine icon was placed in the top right corner of your menu bar, click that icon (as pictured below) and select 'Enter Time Machine'. Notice that Time Machine tells you the date and even time of your last backup. Make a note of this date and time, especially if you have done multiple backups.

If you do not have the Time Machine icon, click 'Apple' icon in the top left corner of your screen, select 'System Preferences', then within the 'Systems' section, select 'TimeMachine'. Tick the box at the bottom of the window labeled 'show Time Machine in menu bar'. See image below. When done, follow the step above to 'Enter Time Machine'.
As pictured below, you should see miniature 'Finder' screens. BTW, these mini screens are live with folders that can be clicked and opened. If you have multiple mini screens, each represents different times that you backed up. The most recent backup appears in front of the stack of mini screens. The precise time of a mini screen appears at the bottom of the screen, below the set of mini screens.
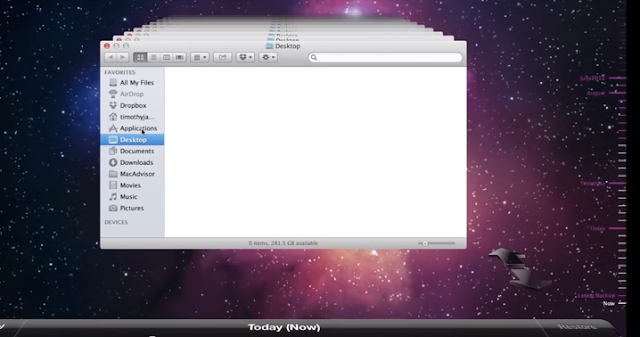
To restore the entire machine to how it was at the time of your last backup, select the mini screen by clicking on the top of the mini screen .. Ensure that the date and time for the mini screen is what you want. It appears below the stack of mini screens at the bottom of your screen. Select the 'MacIntosh HD'................. within the live mini screens. Click 'Restore' on the right corner of your screen, next to the backup time. (BTW, if you wanted to restore a single file or application like 'iMovie' from when you last had it, you could go into the 'Applications' folder on the mini screen for the current date, then scroll back in time by clicking the arrow button that points back in time to the right of the stack of mini screens. Time machine scrolls back through older mini screens on your selection, in this case the 'Applications' folder. When Time Machine finds a file that was previously in that selected area ('Applications' for this example), but is no longer there, namely iMovie, it will automatically stop at that date. Select the application and then click 'Restore'.)
8. Resetting the SCM to Speed Up a Slow Mac
Apple advises that this process be attempted when problems have not yet been rectified by other means. Apart from helping when your Mac is running slowly, this process can also help with several of the other problems like: fans are overworking when your Mac is not in heavy use, strange keyboard light activity, power button does not respond normally, max powers off without your prompting, the batter does not charge properly, the power adapter light does not work, problems with the video card. Learn more about and see how to reset the SCM from Apple.
9. Delete Browsing Data to Speed Up Web Browsing
Browsing data, also known as 'browsing history' keeps a record of all of your internet activity. It is sometimes very useful when you want to retrieve a webpage that you stumbled upon in the past but have trouble finding again. However, it can slow your Max's performance online. If you wish to clear browsing history from time to time, I suggest bookmarking sites that you like. The following steps show how to remove browsing history for Safari, Google Chrome and Firefox.
10. Detect and Remove Malaware to Speed Up your Slow Mac
Sometimes, the problem may be related to a virus or some other form of malaware programs that are notorious for slowing down any computer. Don't be fooled, even Mac computers are now being targeted by hackers. Use antivirus software for Mac. A popular free antivirus program from Mac is Avast. In fact, the technical support team recommended it to me. Note however that antivirus programs (and Avast is no exception) do not necessarily remove the problem at its root. Rather, they may simply offer some limited protection against a potential threat. See an example of how the Free Avast Antivirus Reporting system works.
Clear Browsing History in Safari to speed up your Slow Mac
Click 'History' in the top menu
Select 'Clear history' which is the last option on the drop down menu
You will be asked whether to also reset your top sites. Top sites are those that you generally visit often. These might be ones for which you have allowed your computer to save your password and for which autofilling your password works. if you wish to remove browsing data for those top sites, tick that option then click 'Clear'.
To activate 'Private Browsing' * in Safari, select 'Safari' in the top menu and then 'Private Browsing'
Clear Browsing History in Google Chrome to speed up your Slow Mac
Click 'Google' in the top menu
Select 'Clear browsing data ...'. A new browsing window will appear
In the 'Clear browsing data' box, select the types of browsing history you wish to remove as pictured below.
Clear Browsing History in FireFox to speed up your Slow Mac
Click 'Firefox' in the top menu
Select 'Preferences'
Click 'Privacy' in the top menu of icons
In the 'History' section of the dialog box, select 'never remember history' or 'use custom settings for history'
* BTW, you can use 'Private Browsing', aka 'Incognito Browsing'. Private browsing allows you to surf the internet without accumulating browsing data as normal. NB however that private browsing logs you out of accounts into which you are permanently signed in. Furthermore, none of your preferences and autofill passwords and so on will work until you browse normally again.
11. Check for hardware problems ...
RELATED ARTICLES & NOTES:
currentVote
noRating
noWeight
 --
--


 --
--


