- Go to 'Finder'
- Select the 'Go' dropdown menu (see image below)
- Select 'Utilitiles'

- Select 'Disk Utility'
- Highlight the 'volume' or directory of your Apple Mac computer hard drive to be tested. In the image below, 'Macintosh HD' in the top left region of the disk utilities screen.
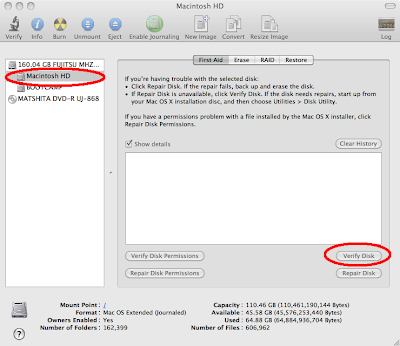
- Click 'Verify Disk' button (see image) to run diagnostics on the selected hard drive on your Apple Mac computer
- Wait while your Apple mac computer verifies the disk. A blue and white bar will move across the screen during the disk verification process (see image).

- If there are no problems, a note will appear that says something like the following in green "The volume Macintosh HD appears to be OK". However, if there are problems, a list of the problems will appear, often with red lines (see image below) to indicate repairs required on the selected hard drive of your Apple Mac.

- If it is necessary to perform repairs on the selected hard drive on your Apple Mac, click 'Repair Disk' button (found directly below the 'Verify Disk' button')
- Perform a second 'Verify Disk' scan to verify whether Disc Utilities was able to repair the problems. The same problems will appear if Disc Utilities was unable to repair your computer's problems. In that case, you will need more technical help.
- Click the 'Verify Disk Permissions' button. Disk permissions refers to the files and folders that can be accessed by certain users and during certain functions. If there are discrepancies, ie permissions that do not meet your computer's usual expectations, the computer could start to experience the problems b, c and d listed above and the permissions should be repaired.
- Re-run the 'Verify Disk' scan. If Disk Utilities can not repair the problems, it will stop the scan prematurely and tell you which disk (for instance the 'Installation' DVD) that should be used for the repair.
- If you need to repair the disk using the Mac OS X Install DVD, insert the disk, restart the computer, hold down the 'C' key when you hear the startup sound, release the 'C' key when the gray screen and Apple logo appear.
Tuesday, October 22, 2013
How to Check for Hardware Problems on an Apple Mac Computer
If your Apple Mac computer is a) running slowly, b) not allowing you to always log in, c) print, d) launch applications and or e) you suspect that hackers are accessing your and manipulating your computer settings, use the following steps to check for hardware problems. This illustration was performed on an earlier Mac OS X 10.6.8 operating system.


Subscribe to:
Post Comments (Atom)
No comments:
Post a Comment
Note: Only a member of this blog may post a comment.