Showing posts with label graphics. Show all posts

Sunday, April 9, 2017

Promotional Video for Small Business Success

Step 1: Set goals and objectives for your promotional video
  • Common examples of goals include the following. This goal should be the story that every video element should help tell.
    • to build brand awareness. Remember to include your unique value proposition and brand story line. 
    • to promote product awareness. Include your unique selling point.
    • to train staff about the importance of doing X
    • to sell product X (if to promote sales, keep the length within 2 minutes).
  • Be clear about your target audience, especially if the audience is a narrow segment with special circumstances and needs. Think psychographics! You must keep these in mind so that you can respond directly as if speaking to each individual personally. If possible, allow a 'character' who is relatable to your target audience be the protagonist, through whose eyes your audience will vicariously experience your product.
--
--
  • Create a rough plan with a shot list. Every shot should contribute directly to your goal.
    • opening shot. This shot usually shows the brand visually. A common way is showing the logo, homepage or store front for brick and mortar businesses. This shot should not be too busy and should therefore have limited movement or changes in frame.
    • emotionally charged shot(s) show the emotional result your product provides and not just product itself. For instance, rather than showing a box of your chocolates, this shot will show a child's or lover's face lights up. It shows people people holding hands on a cozy bench having quiet quality time.
    • b-roll. B-roll is supplemental footage that supports the main shot. Think of b-roll as digital atmospherics that portray the particular theme or message. For instance, while a woman speaks of how the dark cocoa flavor of your chocolate makes her feel better on rainy days, b-roll may show her having some quality alone time in a bathtub surrounded by candles, petals and, of course, the partly open wrapper of your chocolate. Maybe she writes in her journal before smiling.
  • Establish measures of promotional success. Examples include a target number of views or instances of some type of engagement.


Step 2: Gather equipment for shooting your promotional video


  • Recording devices may be smartphones or other camera. Other ideals include some means of stabilizing the camera like a tripod or a nearby desk.
  • Video editing software

Step 3: Record the promotional video

  • Find a a recording environment that is relevant and appealing to the target audience
  • Ensure the environment will be free of interruptions or other elements that will detract from your presentation. For instance, avoid distracting ambient sounds like traffic and dogs barking or unpleasant sights like an untidy living room and dirty laundry
  • Use a location that has lots of natural lighting
  • Keep the content relevant and concise. If you need to avoid going off on tangents, pin a few bullet point keywords next to the camera. However, do not read from a script. 
  • Be easy on yourself. Most people master a presentation by recording it in multiple short parts rather than attempting one long perfect clip
  • Allow a few seconds before and after content for editing purposes
  • Do and review a practice take. See how it can be improved.
  • Always end with a call to action (CTA)
  • Have fun


Step 4: Post-production of your promotional video

  • Attach branding. A common example is to embed your logo in a corner
--
--
CONTENT RELATED TO MAKING A PROMOTIONAL VIDEO FOR YOUR BUSINESS

Tuesday, March 28, 2017

Change or upload Facebook page cover banner

A Facebook banner image is called a 'cover'. Since it dominates the top portion of a Facebook fan page, arguably dwarfing the logo, its high visibility makes it very important in reflecting changes in your business. Here is how you can quickly and easily change it for tentpole marketing or just routine improvements to your Facebook page.
  • Log in to your Facebook page
  • Hover over the camera-looking icon in the top left corner of the Facebook cover / banner image. As pictured below, the text 'change cover' will appear. 
Change or upload Facebook page cover banner

  • Click 'change cover' 
  • Select from among the image options that appear

Change or upload Facebook page cover banner

--
--
CONTENT RELATED TO UPDATING FACEBOOK COVER / FACEBOOK BANNER IMAGE

Sunday, March 5, 2017

Convert Hexadecimal to RGB Color Codes in MS Excel

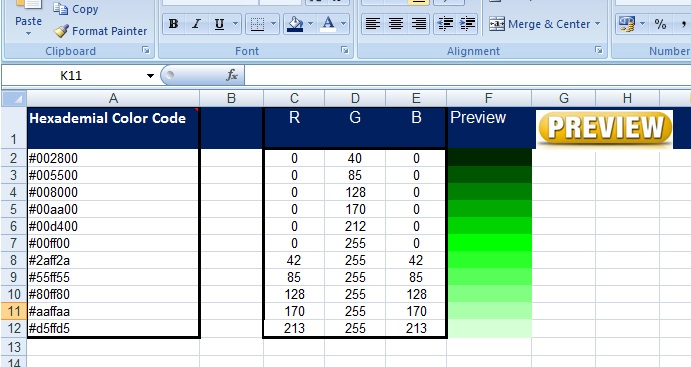
Convert hexadecimal to RGB color codes by creating a new MS Excel file or with a downloadable MS Excel file linked below. 

Create the MS Excel file to convert hexadecimal to RGB color codes

These instructions assume you already know how to create new files and enter formulas
  • Create an MS Excel file with the columns as pictured above. Cells columns C to F will be empty below the column headings (in row 1)
  • Select cell C2 and enter the following formula:  =HEX2DEC(MID($A3,2,2))

  • Repeat the previous step for cell D2 using the following formula:  =HEX2DEC(MID($A3,4,2))
  • Repeat the previous step for cell E2 using the following formula:   =HEX2DEC(MID($A3,6,2))
  • If you wish to see the color preview, you will need to 
    • install an image of a button or simply write text like 'preview' in cell G2 
    • set up a color macro (not discussed here)
    • right click on the image, select 'assign macro' and then select the macro ('color')

--
--

Use the downloadable MS Excel file to convert hexadecimal to RGB color codes

  • Download this MS Excel file to convert hexadecimal to RGB color codes
  • Enter a 6-digit hexadecimal color code into a cell of the first column. For instance, black is #000000. The RGB code will appear automatically in the columns to the right
  • If you wish to preview the color, ensure the macro is engaged by right clicking on the 'preview' button that is immediately to the right of the color preview column. Select 'assign macro', then select 'color' as pictured immediately below. Click 'OK'
Convert Hexadecimal to RGB Color Codes in MS Excel


If the preview button is not working, you may see the highlighted warning below. Click 'options ...' button, select 'enable this content' and then 'ok'

  • Click to select the corresponding cell in 'preview' column
  • Click the 'preview' button. The color should change in the preview window
--serverpoint hosting banner --
CONTENT RELATED TO CONVERTING HEXADECIMAL TO RGB COLOR CODES IN MS EXCEL
  • Downloadable MS Excel file to convert hexadecimal to RGB color codes. [New late-2020 update: Please include a private message along with your request for access and or a comment below. Please reassure us that you will use the file in a safe way that can not harm anyone else.]
  • Coding inspired by ExcelCoder.com (https://www.dropbox.com/s/ayb3603gy3you1o/RGB%20to%20Hex.xlsm?dl=0)

Friday, July 22, 2016

How to Create a Radial Gradient Filter over an Image in InkScape

This post continues from the previous post about creating transparent gradient filters over images in InkScape. These kinds of radial gradient images can be used for product collections. Although this post shows how to use this effect using the radial gradient within a circle, you can do the same within a rectangular shape.
How to Create a Radial Gradient Filter over an Image in InkScape


  • Import an image
  • Draw a circle over the image. For richer colors in the result, make the color of the circle a lighter color (like white or close to white). Conversely, chose a darker color.

How to Create a Radial Gradient Filter over an Image in InkScape
--
--
How to Create a Radial Gradient Filter over an Image in InkScape
White gradient
How to Create a Radial Gradient Filter over an Image in InkScape
Red gradient

  • Select and right click on the circle. As shown below, select the 'Fill and Stroke' option 
How to Create a Radial Gradient Filter over an Image in InkScape
  • In the 'Fill and Stroke' dialog box, select the 'radial gradient' option
How to Create a Radial Gradient Filter over an Image in InkScape
  • In the lower part of that 'Fill and Stroke' dialog box, increase the 'Blur' effect as highlighted in the encircled section in the image below. This effect will soften and blur the edges rather than create a hard circular edge. When increasing the blur, the black handle bars around the object will extend. Ensure they never extend outside the straight edges of the image.
--
--
How to Create a Radial Gradient Filter over an Image in InkScape
  • Select the image and gradient section. As pictured below, dotted borders will appear around both (to indicate that you have made the selection correctly).  
  • From the top menu bar, select 'Object', 'Mask' and 'Set'
How to Create a Radial Gradient Filter over an Image in InkScape

  • The result will look like this
How to Create a Radial Gradient Filter over an Image in InkScape
White gradient

  • Create a rectangle (that you can use as a label). Place that rectangle to the back of the image by selecting 'Object' and then 'Lower to Bottom'.
How to Create a Radial Gradient Filter over an Image in InkScape


Related Articles


Thursday, May 1, 2014

Adobe Illustrator manual - Free Ebook with photo illustrations

The free Adobe Illustrator 101 manual includes steps along with photo illustrations. Below are the table of contents for version 1May2014 and a link to the ebook. It is available free for personal use.
zzzzzzzzzz

INTRO TO VECTORS................................................................................................ 3
BASIC TOOLS............................................................................................................. 3
Selection Tool............................................................................................................ 3
To move a shape.................................................................................................... 3
To re-size a shape and distort it only slightly....................................................... 3
To re-size a shape and maintain the proportions.................................................. 4
Direct Selection Tool................................................................................................. 4
To distort a shape.................................................................................................. 4
Pen Tool..................................................................................................................... 5
To draw object with straight lines (to draw a house)............................................ 5
To draw lines at perfect 90 or 45 degree angles..................................................... 5
BTW, to draw perfectly horizontal or vertical lines.............................................. 5
To change the shape by moving single points or whole lines with(out) maintaining 45 or 90 degree angles     6
To draw object with curved borders...................................................................... 6
To nudge shape borders (to alter its shape)........................................................... 7
To create smooth S-like shapes............................................................................. 8
To switch from making curved to straight lines..................................................... 9
To add anchor points (to an object that did not previously have any, like a straight line)        9
To convert straight lines into curved lines........................................................... 10
To complete tool application on 1 object before moving to another................... 10
To start drawing a line curved and then change to straight midway.................... 10
Type Tool................................................................................................................ 10
To type text (that does not wrap automatically)................................................ 10
To create text box (that automatically wraps text).............................................. 11
To write text that conforms to the specific shape of a close-ended object (any shape: circles, etc …) 11
To type along unconventional line shaped path (ie a line like a curvy line, spiral or other open-ended path)  11
To adjust font, size, spaces, etc …...................................................................... 11
To move around individual letters / re-shape a letter........................................... 11
Text Tool................................................................................................................. 12
To vectorize your text......................................................................................... 12
Rotate Tool (to repeat objects around an axis)........................................................ 13
Fonts Effects............................................................................................................ 14
Install fonts onto your computer......................................................................... 14
100% free fonts (for commercial use too)............................................................ 14
Free royalty free fonts for anything (but donations are welcome):..................... 15
Line Tool.................................................................................................................. 15
Rectangle Tool......................................................................................................... 16
Gradient Tool........................................................................................................... 16
Eye Dropper Tool................................................................................................... 17
Zoom Tool............................................................................................................... 17
Hand Tool................................................................................................................ 18
zzzzzzzzzzzzzzzzzzzzz
zzzzzzzzzzzzzzzzzzzzzzzz
Eraser, Knife & Scissors Tools................................................................................ 18
BASIC DEFINITIONS............................................................................................... 19
SET UP & GETTING AROUND GENERALLY..................................................... 19
Finding Palettes........................................................................................................ 19
Setting preferences................................................................................................... 19
Precision!!! Scaling (rulers, other guides, transformation, etc)................................ 20
Aligning various elements precisely – 1 - ruler.................................................... 20
Aligning various elements relative to each other precisely - 2............................. 21
Re-scaling precisely (objects w precise dimensions) – 3 - transformation.......... 21
Aligning various elements precisely – 4 - gridlines.............................................. 21
Make your own guides – 4 – custom guides........................................................ 22
Layers & sub-layers................................................................................................. 22
Importing Images..................................................................................................... 24
Saving images in non Ai formats (JPG, TIFF, PNG, etc), ie exporting................... 24
Stroke / Object Outline............................................................................................ 24
Copying & Pasting Objects..................................................................................... 24
Copy & paste content into new layer in precise location....................................... 25
Making white background transparent.................................................................... 25
Making white background transparent in imported JPG image............................... 26
ADVANCED TOOLS................................................................................................ 27
Pathfinder Tool........................................................................................................ 27
Swatches.................................................................................................................. 29
Symbol Tool............................................................................................................ 30
MORE ARTISTIC FUNCTIONS & TECHNIQUES............................................... 30
Multiple strokes / outlines....................................................................................... 30
Fill colour for objects............................................................................................... 31
Clipping Mask......................................................................................................... 31
Wrapping TEXT around objects............................................................................. 31
Multiple TEXT boxes............................................................................................. 31
Linking TEXT between text boxes.......................................................................... 32
Document colour mode............................................................................................ 32
Fancy t-shirt design: Double clipping-mask effect.................................................. 32
Opacity Masks / transparency gradient.................................................................. 33
Shadows................................................................................................................... 33
3D............................................................................................................................ 33

COMMON PROBLEMS & THEIR SOLUTIONS.................................................. 35
No tools work, strange cursor icon.......................................................................... 35
YOUR CHECKLIST BEFORE GOING TO PRINTERS......................................... 35
Before going to t-shirt screen printers, make the following checks......................... 35
QUESTIONS & SOLUTIONS................................................................................... 35
FURTHER RESEARCH............................................................................................ 36